How to Setup Office 365 Mailboxes Archive and Deletion Policies?
Data archiving is also an important aspect of data storage and the security of old data. Office 365 allows its users to control the settings of the functions according to their needs. But when we archive the data in Office 365 mailboxes, it should be noted that there is a certain time specified in the archived email, in a separate folder, where the mailbox is permanently deleted from there. Here in this blog, we learn how to Setup Office 365 Mailboxes Archive and Deletion Policies.
Let’s take an example – let’s say you have deleted about 20 old or unused mailboxes from your Office 365 account, and these mailboxes are stored in the archive mailbox. Let’s say it’s 3 years of defined storage time in office 365. After this period, all 20 mailboxes in the archive email will be deleted forever automatically. Therefore, today in this article, we will discuss how we can manage this policy for archiving and deleting Office 365 mailboxes.
You should be aware that in Office 365, there is a way to create a retention policy by adding a retention tag that gives you certain storage labels through which you can manage to archive and delete elements of old Office 365 mailboxes.
Get started – Setup Archive and Deletion Policies for Office 365 Mailboxes
To perform this action, you must first be a global administrator with office 365 or administrative rights. Sign in to your office 365 account with global administrator credentials. After logging in, just enable the archive mailboxes for Office 365 users. Follow these steps:
- Just press the ‘admin’ option and select ‘Security and Compliance Center’ from the right panel.
- Now move to Data Governance and click Archive.
- All user mailboxes will get enlist. Here select all mailbox users using the Shift key, and then on the left panel under the ‘Bulk Edit’ option, click the ‘Enable’ button.
- A warning confirmation message will appear on the screen. Click on the ‘Yes’ option to confirm the action.
- ‘Enable’ the archive mailbox for each selected mailbox.
- Once the process completes, click ‘Refresh’ to update the ‘Archive’ list.
CREATING RETENTION TAGS
For Archiving- Archiving Default Policy Tag
- In the ‘security and compliance Center’ >> click ‘App launcher’ in the upper left corner.
- Then Click the ‘Admin’ option >>‘Admin Centers’ and select the ‘Exchange’ option under it.
- The page of the exchange admin centre will be opened. Select the ‘Compatibility Center’ here and then click ‘Retention Tags’. Click the plus icon and select the ‘applied automatically to entire mailbox (default)’ option.
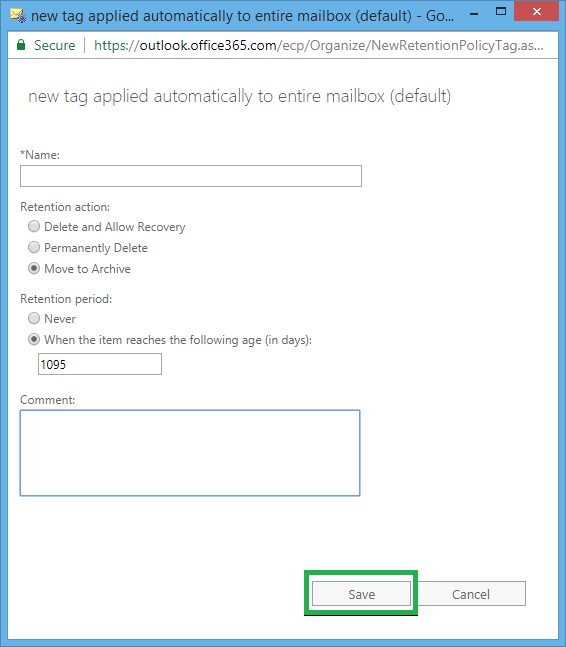
- On the opened page, complete the following fields:
Name: fill any name for the retention tag
Retention action: Select the option Move to Archive from the given options Delete and Allow Recovery, Permanently Delete and go to Archive
Retention period: here type the number of days (as you require)
After filling all these details, just click on ‘Save’ option.
For Deleted Items Folder- Custom Retention Policy Tag
- Go back to the ‘Exchange Admin Center’ in office 365, as it was done in the previous step. Then click on ‘Compliance Governance’, and then click ‘Retention Tags’.
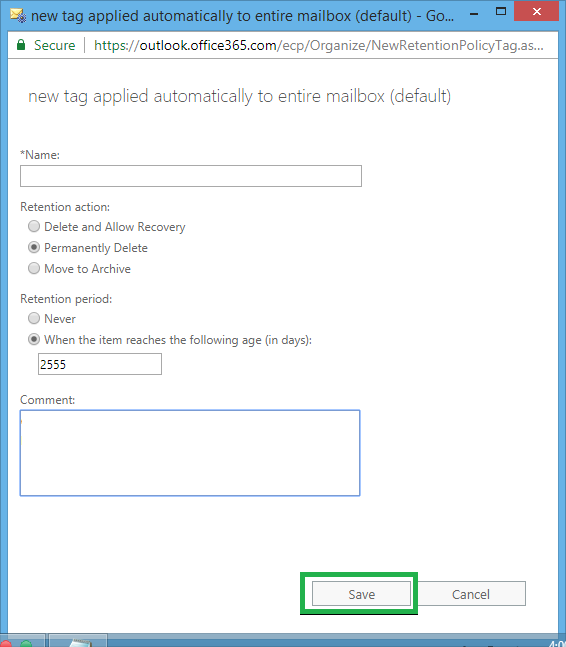
- On the ‘Retention tags’ page, click plus icon, and then select ‘applied automatically to a default folder’.
- On the ‘New tag applied automatically to a default folder’ page, enter the details like name, this time choose retention action as Permanently Delete, and enter the Retention period in number of days.
- Click on ‘Save’ option to save the entries.
Similarly, you can select another option to delete and permission to recover from the retention action. Here the items are deleted after a specified period and the option to restore is set after 14 days (default).
CREATING NEW RETENTION POLICY
- In Exchange Admin Center of Office 365, Navigate to Compliance Center > select Retention policies.
- Click the plus option and open a new policy page. Write the name here. In the Retention Tags category, click on the plus icon, and then, if necessary, select the created retention tags listed above along with other possible tabs. Click the Add option to add tags, and then click OK
- Then review these new retention tags and click Save.
ASSIGNING NEW RETENTION POLICY TO MAILBOXES
- Move to the ‘Exchange Administration Center’ page again in Office 365. Click here on ‘Recipients’ and then select Mailboxes.
- Select all the recovered mailboxes (or select selective users), and then on the left side, click ‘More. Now under the ‘Retention Policy’, click the ‘Update’ option.
- The policy page for keeping ‘bulk assignments retention policy’ opens. Here, select the created policy from the drop-down menu and click ‘Save’.
It will create a newly formed Retention policy in Office 365 for user mailboxes. In 7 days, Office 365 user mailboxes will be added to this new policy. Also, if you want to keep Office 365 data in a safe place, you can try the most effective and proficient third party solution – Export Office 365 to PST software. It supports all versions and plans of Office 365 and quickly stores the required data in Outlook PST format.
FAQs
Q. What is the process for exporting Office 365 to PST with this tool?
The steps to migrate Office 365 mailboxes to a PST file are as follows:
- “Export Office 365 to PST Tool” will be launched.
- Add Office 365 accounts to export; click the “Add button.”
- Export Office 365 data to a PST file, use Selective Action.
- Begin the migration, click “OK,” and then save the migration log reports.
Q. Is the Office 365 to PST Export Tool compatible with all Office 365 plans?
A. Yes, This Office 365 to PST Export Tool compatible works with all Office 365 plans
Q. Is it possible to use the Export Office 365 to PST tool without having Outlook installed on my computer?
A. Yes, you don’t need to have Outlook installed on your computer to use the tool. It will run without a problem and save data to PST without a hassle.
Q. Is it possible to look for a specific mailbox?
A. Yes, you definitely can. This tool allows users to look for a specific mailbox among all mailboxes using the “Search” functionality.
Q. What is the benefits of free demo version which your company provide?
A. Yes, the free version allows you to view a preview of all converted mailbox data. You must acquire the full version license to save these items. You can manually check this.