How to Migrate Mailboxes from Gmail to Office 365?
Gmail to Office 365 Migration can be considered by any user or by a full organization. It can be caused by the rearrangement of the enterprise or office cloud function and performance. Moving data from one location to another is entirely the user’s choice and requirement. The transition from a web client program to a cloud program can be done manually or as a third-party professional tool.
Since users are more likely to try to use the manual procedure for their satisfaction hence, here we have given them a procedure through which they can try it themselves.
Manually Migrating Gmail mailboxes to Office 365
Following is a list of manual migration procedures given in which you must complete them one after another.
Verification of user’s domain in Office 365Here, users must first confirm with Office 365 that they have a domain used on the Gmail account. Follow the steps.
- First of all, you need to log in to your Office 365 account.
- Then on the Admin Center page, click on the ‘Go to Setup’ button that is found near ‘your setup is incomplete.
- Now select Domain, and go to Add Domain.
- Select the radio button “I already have a domain name” and then type in your domain name. Then click ‘Next.
- Now check the domain with two options, Login to go-daddy, or check the TXT record.
- First, the user has to sign the go-daddy credentials, and later, when verified, Microsoft manually delivers the TXT value to the user’s domain name.
- Adding and Licensing the Users to Office 365
At this point, users are required to add users to Office 365, and once they have decided how many customers they need to create or purchase licenses for them before creating Office 365. Go to Admin Center>> Billing>> Subscribe>> License Add / Remove. Then select the number of licenses required for the purchase, whether a monthly subscription or an annual subscription.
Transfer Mailboxes from Gmail to Office 365
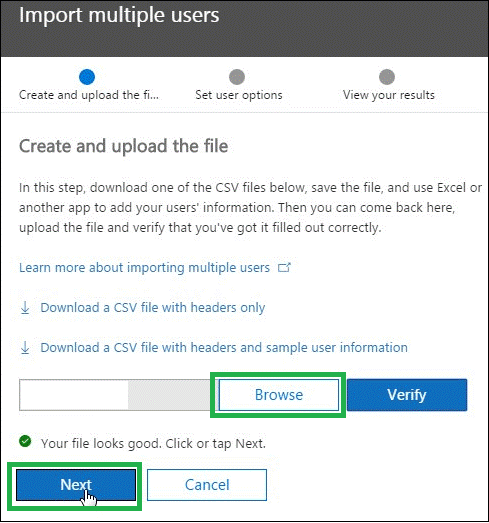
Now users are required to add users to Office 365, navigate to the Admin Center>>Users>> Active Users>> More>> Import multiple users. Here, users can select the option – “download the CSV file with the header and sample user information” for downloading the sample file and to create a CSV file to add multiple users. This CSV file has all the details based on the header row, such as:
# username # name # last name # screen name # job title # section # office number # office phone # cell phone # fax # address # City # State or Province # ZIP or Postal Code # Country or region and specify user details in the following rows.
Once you have created the CSV file, click on the browser, select the file and add it. You can confirm the format by checking on the ‘Verify’ tab. After confirming the format, click Next.
Users will be added. Now assign a previously purchased product license to each additional user.
3. Creating List of Gmail mailboxes for migration
Users must have a list of all email addresses in the mailbox and passwords in the Excel sheet in advance. For e-mail addresses, users can log in to Office 365 and go to Users>> Active Users and copy the e-mail address of all created users.
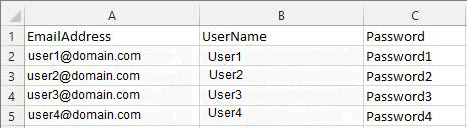
Now create a CSV file that will add user details under the heading – # Email Address, # User Name, # Password, where # Email Address refers to Office 365 Email Address, # User Name refers to sign in the name of the Gmail mailbox. # and the password is the password of the Gmail mailbox user.
4. Establishing a connection between Office 365 and Gmail application
The connection can be made between Office 365 and Gmail through the last migration points (technical term for the settings needed to create migration connection). Follow the steps below to create the migration required for the connection between the two applications.
- Go to the Exchange ‘Admin Center’ and open it.
- Now move to Recipients>Migration>more… > Migration endpoint.
- Here just click on New+ to create a migration endpoint.
- Then go to the ‘Select the migration endpoint type page and select ‘IMAP’ option.
- Now a page will open on the screen – ‘IMAP migration configuration’.
- Now, set the IMAP server to imap.gmail.com to keep the other setting to default and click Next.
- If the connection is successful, ‘Enter general information page’ will appear.
- Enter the migration end-point name (let the other blanks get the default value) and click New.
- Finally, the new migration endpoint will get created.
5. Starting migration with creating a migration batch
Before moving from Gmail to Office 365 during the manual migration process, you must create a migration batch. Create a migration batch with the following steps:
- First login to Office 365, and click on Admin centre.
- Now move to Admin Centers>>Exchange.
- Navigate to Recipients>>Migration.
- Now click on New+and go to ‘Migrate to Exchange Online.
- Here, just select ‘IMAP migration’ and click on ‘Next.
- Now a ‘Select Users’ page will get opened; click ‘Browse’.
- Now choose and add the migration file created in step 3.
- Office 365 will start verifying the file with different criteria. If the file is good, it will display information on the number of mailboxes for migration. Click Next.
- Select the previously created migration end-point and click the ‘Next button on the next page that will open.
- The IMAP migration configuration page will appear. Select the default values and click Next.
- Then on the ‘Move configuration page’, enter the migration batch name, use the filter settings (if necessary) and click ‘Next.
- The ‘Start the Batch’ page will open. Here you can select the address to receive notifications about migration; click on the Browse button. And go to automatic start batch> new. Migration begins, and status shows synchronization.
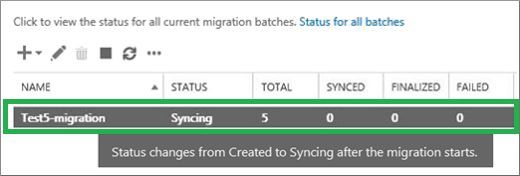
So it started migrating Gmail mailboxes to the office, and it will take some time to complete. Users can visit Exchange ‘Admin Center’ if they want to check the migration status. Users can do it by navigating to attractions> migration and checking how much status has been updated in Synced.
The work is not over yet. To ensure smooth & successful migration, each user who wants to migrate must follow the steps:
- Login to Office 365 account with username and temporary password.
- Update the password and set the correct time zone.
- Open Outlook Web App and send an email to another Office 365 user and in Outlook, check all folders.
The manual migration process we have discussed above can be performed, but only if the users or organization has enough time. Also, there is a chance of mistakes with such a long process. Technical knowledge is in demand here. A professional third-party tool such as an IMAP to Office 365 migration tool is recommended for busy users and the emergency scenario. The advanced program is available and comes with intellectual filter options. So if you are looking for reliable migration without error, consider this tool freely.
FAQs
Q. How does this Tool migrate IMAP mailboxes to Office 365 platform?
A. The steps for migrating IMAP mailboxes to the Office 365 platform are as follows:
- Use the “Export IMAP to Office 365 Tool” to export the IMAP data to Office 365.
- To add IMAP accounts to export, click the “Add button.”
- Export IMAP mailbox data to Office 365 Platform using Selective Action.
- To begin the migration, click “OK” and then save the migration log reports.
Q. Is it possible to transfer Gmail IMAP to Office 365 using this software?
A. Yes, this software makes it simple for users to export all Gmail IMAP mailboxes from the server to Office 365.
Q. Is this software compatible with all IMAP email servers?
A. Yes. This email converter software is compatible with all IMAP email servers, including Office, Exchange, GroupWise, Lotus Notes, Yahoo, Gmail, Outlook.com, etc.
Q. How long will it take this software to export an IMAP mailbox to Office 365?
A. The amount of time it takes is determined by the size of the IMAP Mailbox data file, and this software effectively makes the migration secure and simple.
Q. Is it possible to view the desired emails without purchasing an application?
A. Yes, it has a free version that allows users to preview all migrated mailboxes. You can manually check this. You must purchase the full version license to save these items.